This report can be generated if your business has access to the Create a report function in the Report generator.
You can create a detailed per-employee report that includes protections, coverage, volume per coverage, rates, and premium amounts.
This procedure uses Report format “Excel (non formatted)”. Depending on how familiar you are with Excel software, you could personalize your file, for example, by creating a table using the Pivot table function.
Access: Reports > Report generator > Reports list
Important ▪The monthly premium report data is extracted from the event history, which is generated according to the dates entered in the different fields, such as Salary change date (Employee file > Employee > Profile > Employment and compensation > Remuneration section), Change date and Eligibility date (Employee file > Employee > Benefits > Group insurance). Click
▪It is only once a payroll is processed that our application generates the event history that modifies an employee’s group insurance premiums. Therefore, you should only generate your monthly report once the last payroll of the month has been processed. Example: An employee salary change is in effect on March 25. Your pay period is from March 22 to April 4 and payroll is processed April 7. You will need to generate your March monthly report after the April 7th payroll processing in order for it to include the salary change. ▪Note that future modifications are not taken into consideration because the pay period in which the modifications are applicable has not yet been processed. |
1Click on Create a report.
2Enter the English report name and, if you wish to do so, enter a French report name.
3Select the Employee status:
▪“Limited”: The report can be used by all users but modified by you only (recommended);
▪“Private”: The report can be used and modified by you only;
▪“Public”: The report can be used and modified by all users.
4Select the Groupe or select “Add item...” to create a new group if needed.
5Under Base table selection, select the category Human resources - Employment profile, then the table Employee coverage - Monthly premiums.
6Click on Next.
7Under Selection of report fields, select all the Available fields that appear in the table on the right and transfer then to the Selected fields table below it. To do so, place your cursor in the table, press the [Ctrl] and [A] keyboard keys, and click on the ![]() icon.
icon.
8Add the fields taken from the different tables specified in the chart in Step 9.
▪The field Include employees terminated in prior years (Employment and compensation table) must be selected as a “Filter only”. To do so, click on the field, then the ![]() icon.
icon.
▪A filter is used to filter the data but does not appear on the report.
9Modify the field order so that it corresponds to the one indicated in the Order column. For more information on field selection and order, click ![]() here.
here.
•The order in which the fields selected are indicated corresponds to how they will appear (from left to right) in the report header.
a)Go back to the Available tables on the left of the screen, then click on a table specified in the Available tables column of the chart below. For some of them, you will need to click on the b)Once the table is selected, select the fields (the ones indicated in the Fields selected column of the chart below) from the Available fields table on the right of the screen and transfer them to the Selected fields. c)If there is only one field, click on it and transfer it by clicking on the d)If there is more than one field, press and hold the [Ctrl] key, and using your mouse, click on the desired fields. Let go of the [Ctrl] key, then click on the e)Once all the fields are transferred, click on the upward and downward arrows to move the fields to respect the order indicated in the Order column of the chart. |
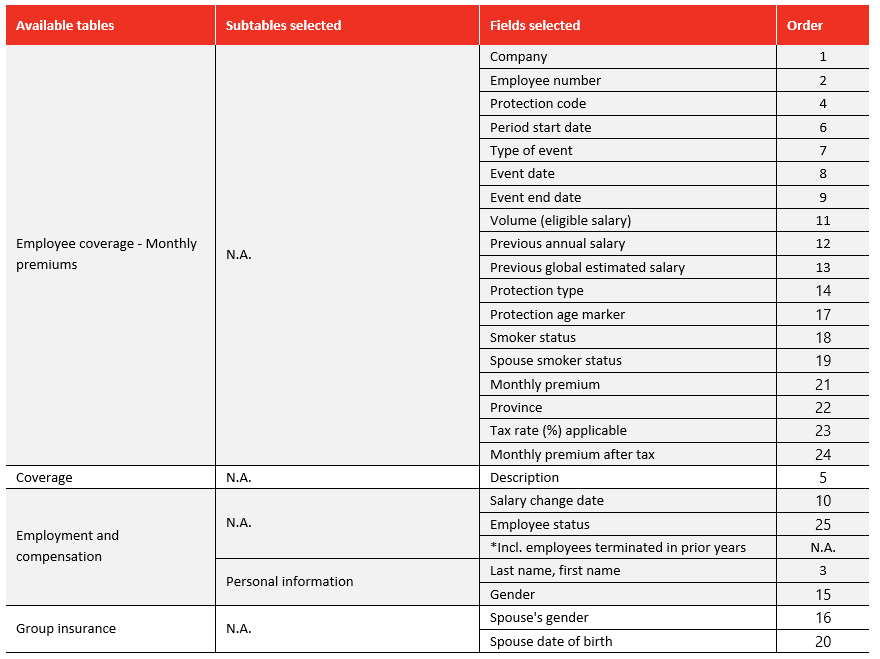
* This field should only be selected as “Filter only”, as described at Step 8.
10Click on Next.
11Under Default filters, leave the default filter that excludes employees terminated in prior years.
12Add a filter to obtain data for a specific date. To do so, click on Add.
13In the Edit a condition window, select Event end date (Employee coverage - Monthly prem).
14Select the Greater than or equal to (>=) criteria, then select or enter the date of your choice.
15Click on Add.
16Select the comparison operator And, then select Event date (Employee coverage – Monthly prem).
17Select the Less than or equal to (<=), then select or enter the same date than the one entered at Step 14.
18Click on Confirm, then on Next.
19Under Groups, if you have more than one company, you can create a group with the company and employee numbers. For the steps to follow, click ![]() here. Otherwise, continue to the next step.
here. Otherwise, continue to the next step.
a)Under Available fields, select Company (Employee coverage – Monthly prem) and Employee no. (Employee coverage – Monthly prem). b)Transfer them using the c)Go to step 20. |
20Under Sort, click on Add, then select Company (Employee coverage - Monthly prem).
21Repeat the last two steps by selecting Employee no. (Employee coverage – Monthly prem) and Protection code (Employee coverage – Monthly prem).
▪The Protection code (Employee coverage – Monthly prem) can be replaced by Description (Coverage).
22Click on Produce.
▪You can click on Finish to save your data and produce the report at a later time.
▪During the execution phase of the report, make sure to enter the same date in the Value field as the one corresponding to the Event end date and Event date fields.
23Select Report format “Excel xlsx (non-formatted)”.
24Click on Execute. View an example of the report.
For more information